Entering
Text and Hyperlinks |
|
|
|
|
On this page you'll learn the fundamentals of entering text in your Web pages, then learn how to modify the style your text is displayed in. If you are already familiar with word-processing in Windows, you may wish to skip directly to the hyperlink section, where we'll also show you how to create a text hyperlink with WebExpress. Below
is a reproduction of some of the text tools that appear on the WebExpress Toolbar: |

Step 1: To continue building our step-by-step sample Web page, we'll start by typing some text into paragraphs. Paragraphs in WebExpress can be formatted quickly. As with a word processor, selecting a paragraph format will change the appearance of an entire paragraph at once. - Type
the following lines into WebExpress. Press "Enter" after each line to make that line a separate paragraph.
|
My Sample Home Page
Welcome to the sample page that I'm creating with WebExpress. WebExpress features:
'What You See Is What You Get' word processor style editing
HTML Table and Form support
A built in Web Site Manager
Watch this space for the great Web pages I'll be creating in the near future! |
- Important Note: When you press "Enter" at the end of a paragraph notice how the next paragraph will start below the first with a blank line in between. That's how the HTML tag <P> (for paragraph) works.
To
start a new paragraph without the blank line, hold down the "Shift" key when you press "Enter". This will cause WebExpress to us the HTML separator <BR> (line break), and the new paragraph will appear directly below the first. |
Step 2: We'll now begin formatting your text by turning the paragraph "My Sample Home Page" into a Centered Heading on your page: |

 |
- Move the cursor up to the "My Sample Home Page" paragraph using your mouse or keyboard.
- As
shown at left, Click the arrow on the side of the Paragraph Format List Box and a list of options will be shown. Select "Heading 1" from the list.
- With
the cursor still on the paragraph "My Sample Home Page", click on the "Center" button from the group of Text Alignment Buttons as shown at left. Your first paragraph should now be a centered heading for your page.
|
Step 3: Next we'll change the first sentence of the second paragraph to a Bold Italic font style. - Highlight
the entire first sentence by placing your mouse cursor at the beginning, holding down the left mouse button, and dragging your mouse to the right until the entire sentence changes colors as shown below:

|
- Leaving the text highlighted, click on the Bold style button in the Font Style button group on the toolbar. Then click on the Italic style button as well. The Font Style button group should now appear as it does at right, and your sentence should now be diplayed as bold/italic.
|
 |
- Note: There are many other font style combinations you can use, and you can even change the color your text is displayed in by first highlighting the text you want to change, then selecting a color from the Font Color List Box.
|
Step 4: Now we'll format paragraphs 3, 4, and 5 into a Bulleted List. You can also create other types of paragraph lists in WebExpress, but here we'll use a bulleted list. - Hold
down the left mouse button and drag the mouse pointer down the page so that only paragraphs 3, 4, and 5 are highlighted.
- From
the WebExpress Menu, select 'Format', then 'List', then click on the word 'Bulleted'. You'll see the three paragraphs change to an indented list, each item preceeded by a 'bullet'.
|
- Note: when you insert a new line (paragraph) by pressing the 'Enter' key, the new paragraph will take on the format of the previous paragraph. So to add an item to a list in WebExpress, you just place the cursor at the end of the formatted paragraph you want to insert the new item below, then press 'Enter'. A new paragraph with a bullet (in this case) will be added.
|
Creating A Hyperlink In WebExpressStep
5: Hyperlinks are the heart of the World Wide Web. Text hyperlinks usually display as colored and underlined text. There is an Internet address associated with this text, and when you click on the text in your browser, the browser downloads the Web page from that address. Creating
a hyperlink in WebExpress is nearly as easy as changing text to bold, as you've already done. For our sample Web page we'll create a single hyperlink that will cause the MicroVision Development Home Page to be downloaded and displayed in a browser. |
- In the second paragraph on your page, highlight the first occurance of the word "WebExpress" (it's now displayed as bold and italic).
- With
the word still highlighted, select 'Insert' from the WebExpress Menu, then click on 'Link'.
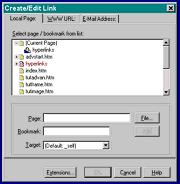
- The
Create/Edit Link Dialog window will appear in the center of your screen. This window is shown at right.
- At
the top of this window, click on the tab that reads "WWW URL". This will allow you to enter a full internet address. The other tabs allow you to enter relative addresses, bookmarks (or hyperlinks that jump to a different section of the current page), or email addresses.
|
 |
 |
As shown at left, enter the address of the Microvision Home Page in the text box that says "URL:". The address is http://www.mvd.com/. |
- Now click the 'Add' button so that your address is added to the list of URLs.
- Finally,
make sure the URL you added is highlighted and click 'OK' on the Create/Edit Link Dialog window. You'll see your hyperlink appear as red, underlined text if you've followed along thus far!
|
- Note: Their are several ways to position your hyperlinks with in your document. For example, you can place them in menus that consist of bulleted lists - or simply include them as part of the text you enter on your page as we have done here. Many people prefer hyperlinks to be included within normal text, but there are times when hyperlink menus are more appropriate.
|
|
 |
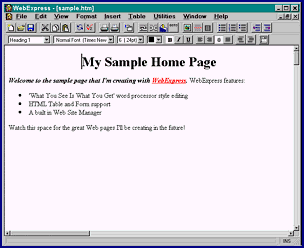
Your sample Web page should now appear as shown to the left. Be sure and Save your page now. Go
ahead and take a look at it with your browser, and test that hyperlink! From
the WebExpress Menu click on 'View', then select the browser you want to use for viewing your page. |
Assignment: Now is a good time to take a break from the tutorial and put what you've learned to use. Experiment! Highlight different parts of the text and experiment with all of the text and formatting controls! - Create
different types of Paragraph Lists.
- Make
more hyperlinks out of Internet addresses you might have.
- Make
bold, italic, and underlined text.
- Highlight
a word and change its font size to a larger or smaller font.
- Change
highlighted words to a completely different font that you select from the Font List Box.
- Even
try turning different parts of the text to various colors.
To
do this experimenting you can use the text you've already entered or even create a new page. If you use your sample Web page don't save the changes you make! We'll be adding to it in the next section of the tutorial, 'Adding Images To Your Web Page'. See you there when you're ready! Copyright
© 1997 by MicroVision Development, Inc |
|
|
************** |
|


