Entering Text: Advanced Topics | ||
Here are examples of some the types of Paragraph List Formats you can create with WebExpress:
To indent lists further into a page, highlight the entire list, then from the WebExpress Menu select 'Format' and 'Promote List'. Use 'Demote List' to lessen the amount of indentation. In addition to creating lists by using the 'Format' menu, there are also Speed Tools on the WebExpress toolbar that you can use. Shown below, they are (from left to right): Bulleted List, Numbered List, No List, Demote List, and Promote List. | ||
Thus, when you create a hyperlink to another Web page that exists in the same directory as the document that refers to it, you need only use the Web page's file name rather than a full-fledged URL. For example, if you have a page at:
... and you create a hyperlink on it that refers to a page at:
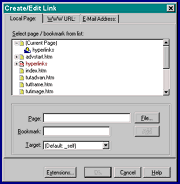
... your hyperlink reference could simply be 'page2.htm', ignoring the 'http://myplace.com/' part of the address. Your browser will look at the location where it retrieved the first document automatically. To create a hyperlink for a relative address, click on the 'Local Page' tab at the top of the Create/Edit Link dialog window and enter the file name of the local page there. Then click 'Add' and 'OK' as outlined in the section Creating Hyperlinks In WebExpress. | ||
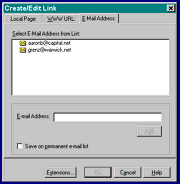
To create a hyperlink that causes a browser to bring up an email window with the proper address already inserted into the 'To' field, highlight the text you'll be linking to the email address, click 'Insert' then 'Link' on the WebExpress Menu, then select the 'Email Address' tab at the top of the Create/Edit Link dialog window that appears. Now enter the email address you'd like to use in the hyperlink, click 'Add' then 'OK'. WebExpress will also save your email addresses on a permanent list if you wish. Just make sure that option is checked when you click 'OK' and you'll never have to type that email address in again! | ||
Bookmarks are actually locations on the current Web page that you can hyperlink to. Instead causing a different Web page to be displayed, clicking on a hyperlink that points to a bookmark causes a user's browser to display that portion of the current page where the bookmark is. For example, click here. As you can see, bookmarks can be very useful, especially on large Web pages. They can be used to place a menu at the top of a page, each link of which will take the user to a different section of the current document. However, you can also use bookmarks to hyperlink one document to a bookmarked location within a completely separate document. Step 1: To create a bookmark at a particular location on a Web page in WebExpress:
View your page in your browser to test the bookmark and hyperlink. That how easy it is!
(Three times if you tried the bookmark sample!) | ||
|
||
That's right, the 'here' hyperlink you clicked on actually took you to the bottom of this page, where we've placed a bookmark. Click here to get back, or you can just scroll back up. | ||

 A
relative address or URL is an address that assumes the current directory or URL is the base of the address.