|
Starting Out With WebExpress |
||
|
To keep this tutorial as simple as possible, we'll describe the simplest WebExpress functions first, using step-by-step procedures to create a sample Web page. We'll provide links to advanced functions within these simple instructions. If you're ready to know more than the basics, you can follow these advanced links. WebExpress takes the mystery out of HTML, the 'language' that's normally used for building Web sites. The friendly WebExpress 'interface' resembles a word processor. For the most part you'll create Web pages as easily as you would create printed documents in the Windows word processor you may already use.
Creating A New Web Page If it isn't running already, start up your WebExpress program. There are two ways to begin your Web editing session: Simply create a new Web Page, or, if you're ready to do so, create a new Web Site using the WebExpress Site Manager. Here we'll show you how to create a new Web Page:.
Step 1: If at all possible, plan your Web page before beginning. Decide what colors you want to use for your page Background, Text, and hyperlinks (highlighted text that is 'linked' to another Web page). If you sit down with a paper and pencil you can also plan the design of the page itself. More on that later.
|
||
|
|
Step 2: As shown at left, select 'File' from the WebExpress Menu, then click on 'New Web Page'... |
|
|
|
Step 3: The Use Template dialog appears. Since you haven't created any templates yet, you only have one choice. Hit OK, and press F4. |
|
|
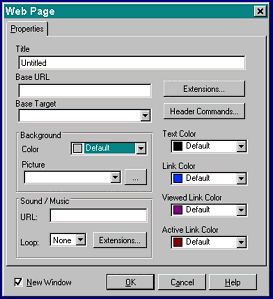
The Web Page Properties window (shown at right) will appear in the center of your screen. Here you'll enter your Web Page Title and select the colors for your page. Other advanced features, like selecting a Background Image, adding Sounds or Music, or entering special Header Commands, are also available in this window. |
|
|
|
Step 4: Enter the Title for your page in the text box marked 'Title'. This Title will not show up on the page itself, but will end up as part of the HTML 'Header' that WebExpress will create for you. For the sample page we're creating, just enter "My Sample Web Page" in the text box. |
||
|
||
|
Step 5: Still within the Web Page Properties window, select the colors you want to use for the different parts (or elements) of your Web page. You can select colors for the following elements of your page:
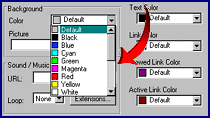
To select a color just click on the 'down-arrow' below the name of the element whose color you wish to change. A color menu will drop down: |
||
|
|
You can scroll the menu to the color of your choice, then click the color when you see it. |
|
|
For our sample page select the following colors:
We'll be a little wild just to get you used to changing colors! |
||
|
||
|
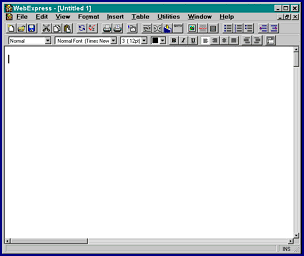
Step 6: With your Web Page Title entered and the colors you want to use selected, click the 'OK' button at the bottom of the Web Page Properties window. That's it! Your WebExpress window should now be displaying a blank page the color of the Background you selected. If you followed the instructions it should appear nearly identical to the window reproduced below: |
||
|
Now be sure to Save the progress you've made thus far. Click 'File' on the WebExpress Menu, then click on 'Save As'. Choose a name for your new Web page (try 'wsample.htm') in the file window that appears and click 'OK'. |
|
|


