The
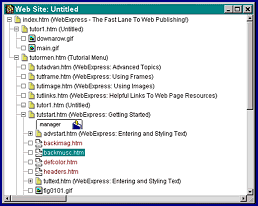
Web Site Manager included with WebExpress is a great tool for managing your entire site. It allows you to view your Web Site in Folder Tree fashion, much like Windows 95 Explorer or Windows File Manager. Most Web Sites exist as one folder on a hard drive. That folder is called the 'Web Root' folder. All files and Sub-folders in and off of this folder are counted as part of your Web Site. When you select 'File / New Web Site' from the WebExpress Menu, you'll be asked to indicate which folder (or directory) you'll be using to store the documents, files, and images that make up your site. That folder will become your Web Root. The built-in WebExpress Web Site Manager will then scan that folder and all of its sub folders. It will display all the files in these folders as in tree fashion. This makes it extremely convenient to load in and edit your HTML documents (Web pages). All you need do is double-click on the file you wish to edit and it will be loaded into WebExpress. Once you have created a Web Site with the 'File / New Web Site' command, you can access the Site Manager anytime by clicking on 'Window' in the WebExpress Menu and selecting the name of the Web Site you created. | ||
You can enhance your Web page tremendously by selecting an appropriate image to be dispayed as your page background. Browsers will display any .GIF or .JPG image as a background, but you should remember that images take time to download. For best results keep background images small (either in size - or at least in file size). A small image will be 'tiled' to fill the background of your page - that is, repeated continuously across and down the page. For the best results make sure you use a properly prepared image that appears seamless when it is tiled by the browser. If you don't have the capability to create seamless images yourself, use our Helpful Links page to find some. It lists several on-line 'libraries' that contain public domain seamless background images. You can also use large, full screen images for backgrounds, but try to keep the file size of the image to under 10K. This is possible if you use .GIF format, and the image itself contains large expanses of the unchanging colors. For example, a full screen image that is half white and half black will be compressed into a .GIF file of only 2K! To select an image for use as the Background of your Web Page:
After selecting your image it will appear in WebExpress just as a browser will display it. | ||
For visitors to your Web Site that us Microsoft Internet Explorer, WebExpress allows you to add sound or music to your Web page. The file formats that you can use include .MID midi music files and .WAV sound files. To add sound or music to your page:
| ||
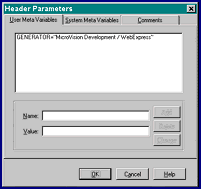
This feature, available from the Web Page Properties window ('File / Web Page Properties') allows you to enter special HTML META headers that will be included in your page. META headers don't show up on your page, but they contain information about it and occasionally can be used to cause the browser to treat a page in a certain way. This feature is for experienced users only, and can be valuable in allowing Search Engines to properly catagorize your Web Site when their 'robots' visit it. Some of the more valuable META tag definitions are KEYWORDS, DESCRIPTION, AUTHOR, COPYRIGHT, etc... You can also use the META tag "REFRESH" to cause your page to be reloaded into a user's browser at specified intervals.
For example, if you entered "keywords" for the header Name, and "spark plugs, air cleaners, steering wheels" as the header Value, the header will be saved to your HTML Web Page file as: <META NAME="keywords" CONTENT="spark plugs, air cleaners, steering wheels"> To learn more about META headers visit our Helpful Links page and check out the HTML reference sites listed there. | ||
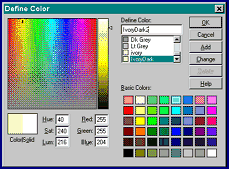
WebExpress allows you to easily define custom colors for your Web Page. You can use these colors to enhance text, your background, and table cell backgrounds. To define a new color you need only select the 'Define Color' option from any of the Color Menus that appear in WebExpress dialog windows - or you can use the Text Color drop down menu that resides on the WebExpress toolbar.
| ||


 The
Web Page Properties window will appear.
 The
Web Page Properties window will appear.
 To
enter a META header using WebExpress:
 When
you select the 'Define Color' option the Define Color window will appear. To use this window to create and add a new color to your page: