Organizing
Your Pages Into Frames |
|
|
|
|
HTML Frame Pages are used to organize multiple Web documents (pages) into an easily accessed single page format that displays other Web documents in 'windows' on that Frame page. This section will explain Frame document fundementals as we help you create Frame 'windows' to display your Sample Home Page in. What
Frames are: These Tutorial pages make use of Frames. The Tutorial Menu you see below appears in one Frame window, while the text you are reading here appears in another window. The windows are divided by a grey line that allows you to use your mouse and resize each Frame window as you see fit.
Step
1: Create the basic pages that will be displayed in your Frame windows. To best illustrate the use of Frames, we'll need to create three very simple Web pages, in addition to the Sample page you've already made. To
begin with, use the instructions from Section 1, Getting Started, to create two new Web pages that read as follows: |
- The Title of the first page you create will be "My Second Sample Page". At the top of this page, simply type the text "This is my second Sample Page." Now save the page as "wsample2.htm".
- Create
the second new page and Title it "My Frame Menu Page".
- At
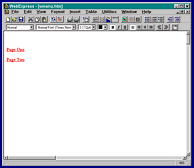
the top of the second page, press the 'Enter' key to create a blank line. Now type the words "Page One" then press the 'Enter' key again to create a new paragraph. Next type "Page Two" on the blank line there. Both paragraphs should appear in a normal font and the text should remain Left aligned.
|
 When
completed, your Frame Menu page should appear as shown above. When
completed, your Frame Menu page should appear as shown above. |
- Highlight the first line "Page One". Select 'Insert' then 'Link' from the WebExpress Menu to make that line a text hyperlink. It should be linked to the file "wsample.htm" (the fancy first page we created).
- When
the first line is finished, highlight the second line and change it to a hyperlink that's linked to the file you just created, "wsample2.htm".
- Now
save the second page as "wmenu.htm".
Step
2: In WebExpress, the document you'll create that contains the Frame windows themselves will be created as an entirely separate page. Let's do that now! - From
the WebExpress Menu select 'File' then 'New Web Page'. In the Web Page Properties Window that appears, change the colors to match the ones we've used for the other pages, and enter the Title "My Sample Frame Page" in the Title text box. Now click 'OK'.
- Save
the new page under the file name "myframes.htm".
- Click
on 'View' from the Menu, then on 'Frames'. The WebExpress window will change to its Frames Mode, and you should see a grey window with the words "No Frames Defined" in its center. This simply means we've not yet created Frame windows for our page.
- Note
that the Toolbar also changes to display the WebExpress Frame Tools. These tools are reproduced and each is explained below:
 - Create/Split
Frames: Allows you to create more Frame windows within the currently selected Frame window
- Combine
Frames: Allows you to Combine or delete existing windows within the currently selected Frame window
- Frame
Properties: Displays the properties of the selected Frame window
- Frame
Set Properties: Displays the shared properties of the Frame windows that exist within the currently selected Frame window
- Insert
Row: Used to insert a Row of Frame windows
- Insert
Column: Used to insert a Column of Frame windows
- Delete
Row: Used to delete a selected Row of Frame windows
- Delete
Column: Used to delete a selected Column of Frame windows
- You'll
become more familiar with these tools as you use them. Their functions can also be accessed from the WebExpress 'Frames' Menu item that appears in Frames Mode.
|
 |
Step 3: We'll now create two vertical Frame windows for the page. - Click
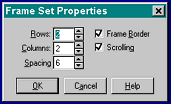
the Create/Split Frames Button on the Toolbar. The Frame Set Properties dialog window will appear as shown at left.
- Change
the number in the "Rows:" text box to "1" and the number in the "Columns:" text box to "2".
- Click
'OK'.
|
- The page should now be divided into to parts with a Frame divider in between. Use your mouse to drag the divider to the left. Continue until the left hand Frame takes up only about 1/5 of the entire page.
Step
4: We now have two Frame windows on the page, a narrow one and a wide one. Now we need to tell WebExpress what Web pages we want the browser to initially display. |
- With your mouse, click once on the larger Frame window at right. You'll see its color change to dark grey. This means it is the currently selected Frame window.
- Now
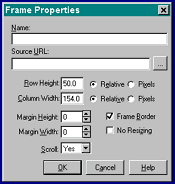
click the Frame Properties Button and the Frame Properties dialog window will appear as shown at right.
- Here
we need to enter two items:
- A
Name for this Frame. The browser will use this name to identify this particular window. In hyperlinks we'll need to include the name of the window we want the linked Web page to be displayed in.
- A
Source URL, or, in our case, the Web page file name of the page we want this Frame to display when it's first loaded into a browser.
|
 |
- For the Name of this Frame, enter "Main". For the Source URL enter "wsample.htm" (the name of your very first Sample Home Page). Now click 'OK'
- Click
your mouse once on the narrow Frame window at left so that it becomes the currently selected Frame window.
- Click
the Frame Properties Button again. We'll give this window the Name "Menu", and enter "wmenu.htm" as this Frame window's Source URL.
- Now
Save this Frame window page under the file name "fsample.htm".
- Exit
Frames Mode by selecting 'View' then 'Web Page' from the WebExpress Menu.
Step
5: We're almost done - but there's one very important step left. When you've created hyperlinks before you may have noticed a text box labeled 'Target:' at the bottom of the Create/Edit Link dialog window as shown below: |
 |
The Target modifier to a hyperlink is necessary for Web pages that use Frames. This is so that we can "tell" the browser which Frame window we want a Web page displayed in. Since each of our Frame windows has a Name this will be fairly easy to do: |
- If it isn't displayed already, open the file "wmenu.htm" in WebExpress. It should contain only the two hyperlinks we created earlier as shown in the reproduction at the top of this page.
- Place
the cursor in the middle of the first text hyperlink that reads "Page One", then select 'Insert' and 'Edit Link' from the WebExpress Menu.
- At
the bottom of the Create/Edit Link dialog window that appears, type "Main" in the 'Target:' text box. This will cause the page linked to by this hyperlink to be loaded into our Frame window named "Main". Now click 'OK' on the dialog window.
- Place
the cursor in the middle of the second hyperlink on the page and follow the same procedure, setting the hyperlink's Target modifier to the same "Main" window.
- Click
'OK' when you're done and Save the page.
|
That's
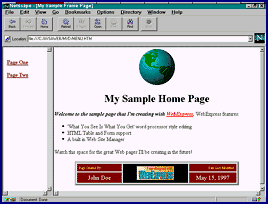
it! Now display the Frame window page ("fsample.htm) in WebExpress. From the WebExpress Menu click on 'View', then click on your browser name. Your
new Frame page should display as shown at right: Test
the hyperlinks in the Frame window at left to make sure they work properly!
|
 |
You'll need to experiment with Frames a little before they'll come naturally. You can start by adjusting various properties of the Frame page we just made, then go on to create a real Web site that uses Frames. |
Important Note: If you plan to use Frames you should also review the Frame Etiquette Guide in the advanced section. |
If you've finished this section successfully you've passed with flying colors!
Click
here to learn about using Java, Java Script, and ActiveX with WebExpress... Copyright
© 1997 by MicroVision Development, Inc |
|
|
|
|


