Tables: Positioning Text & Images

This section will explain fundementals of what HTML Tables are, then start you on the road to creating your own using the superb WebExpress Table editing tools. If you're already familiar with Table basics, you may wish to skip directly to the section Adding A Table To Your Web Page.


An Overview Of HTML Tables

HTML Tables allow you to be more precise when you position images and text on your Web page.

  • A Table is actually a grid of rectangular, editable areas on your Web page.

  • These areas are called Cells, and they appear in Rows and Columns within a Table.

 A sample Table appears below:

Column 1

Column 2

Column 3

Row 1

Cell

Cell

Cell

Cell

Cell

Cell

Cell

Cell

Cell

Row 2

Row 3

Unlike the text and images you've entered into paragraphs thus far, the paragraphs, images, or other HTML elements within each Table Cell are treated independently by a browser.

For example, the Table below illustrates how paragraphs in each Cell are positioned independently next to one another on the page, rather than in a single vertical series of paragraphs:

Column 1

Column 2

Column 3

Row 1

This is a text paragraph.

This is a text paragraph.

This is a text paragraph.

This is a text paragraph.

This is another.


...and a text paragraph in the same Cell.

This is a text paragraph.

Row 2

Row 3

Note also how the paragraphs in the Cells above are each aligned differently. Since Table Cells are independently rendered on the screen, the WebExpress Alignment Buttons (like Center, Left, and Right Align) affect only the paragraph in a particular Cell.


Controlling Table Appearance:

  • You can control the width of a Table and the width of each Column of Cells. This is done in two ways: by specifying a width based on percentage of page (or Table) width; or by specifying the exact width in terms of screen pixels.

  • The height of Table Cells is determined by what you place in them, and the height of the Table itself is determined by of the height of its highest Column of Cells.

  • You can Span connected Table Columns and/or Rows, and make one large Cell out of several smaller ones, as shown below:

Column 1

Column 2

Column 3

Row 1

This is a text paragraph.

This is a text paragraph.

This is a text paragraph.

This is a text paragraph.

This a text paragraph placed into
a Cell that Spans two Columns
and two Rows.

This is a text paragraph.

Row 2

Row 3

Note how the height of this Table is slightly less than the height of the Table above it. Remember that what a Cell contains determines the height of the Cell, and the height of all Cells in a Column determines the height of the Table as a whole.

In addition to controlling Table and Cell width and height, you can also control the Table Border Size (or leave the border invisible), you can control the amount of Spacing between the contents of Table Cells and their border, and you can specify how Cell contents are Vertically Aligned within the Cell. You can even change the Background Color of individual Table Cells.


Nesting Tables:

One of the most powerful features of the HTML Table is its ability to be Nested within another Table. Nesting a Table means that you can create an independent Table within a Cell of an existing Table. For example, all of the Tables shown on this page thus far are actually Nested within a larger Table that contains the Row and Column information. In reproducing the first Table on this page below, we've made the outer Table's border visible so you can see it:

Table 1

Column 1

Column 2

Column 3

Row 1

Table 2

Cell

Cell

Cell

Cell

Cell

Cell

Cell

Cell

Row 2

Row 3

As you can see, HTML Tables enable you to enhance your Web page design considerably. Now we'll show you how easy it is to create and edit Tables using WebExpress!


Adding A Table To Your Web Page

Now we're going to add a simple HTML Table to your sample Web page. While these instructions may seem a little longer that other sections of the tutorial, keep in mind that creating Tables is really a straightforward process and will soon become second nature to you. The results are well worth the effort! Here is the Table as it will appear when we're finished (we'll stick to wild colors for now!):

Page Created By:

Date Last Modified:

John Doe

May 15, 1997

Step 1: To prepare a place for the Table, move the cursor to the end of the last text paragraph on your page, the paragraph that says "Watch this space for the great Web pages I'll be creating in the near future!". Press the 'Enter' key to create a blank line, now click the Center Alignment Button on the toolbar. The cursor should now be blinking on a centered blank line on your page.

  • From the WebExpress Menu, click on 'Table' then 'Insert Table'.

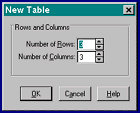
  • The New Table Dialog Window will appear as shown at right:

  • Change the text box that says "Number Of Rows:" to read 2.

  • If it doesn't already say it, change the text box that says "Number Of Columns:" to read 3.

  • Click the 'OK' button and your table will appear! It should have a total of 6 Cells in two Rows and three Columns.


Step 2: Now we'll adjust the width of the Table, in addition to setting a few other properties that will make the Table appear like we want it to.
  • Use your mouse to place the cursor into the Table Cell that appears on the upper left of the Table.

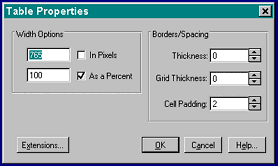
  • From the WebExpress Menu, select 'Table' then 'Table Properties'. The following Table Properties Window will appear in the center of your screen:

  • In the 'Width Options' section, enter the number '500' opposite the 'In Pixels' check box. This will cause a browser to display your Table at 500 Pixels wide, no matter what size a user has his or her browser window sized to.

  • Note: If you specify a width "In Pixels" the Table will always appear that wide. However, you can also choose to set the Table width as a percentage of the browser window size. This means that the appearance of your Table - and the appearance of its contents - will change proportionately with the size of the brower window when that window is resized. To use this method, enter a number opposite the "As A Percent" check box. For example, if you enter the number 50 to be used as a percentage of the browser window size, your table will always appear one half as wide as the browser window. Be sure to test view your table's appearance at different widths if you use the "As A Percent" method.

  • Under the 'Borders/Spacing' section, set the 'Cell Padding' to 5. Doing so will cause a plain 'margin' of 5 pixels to be displayed between the border of the cell and the text or images we place inside.

  • For now we'll leave the Table Border 'Thickness' set at zero. The 'Grid Thickness' text box controls the amount of blank space that shows between actual Cell walls. Leave this at zero for now too.

  • Click 'OK' on the Table Properties Window. Your table should now appear as follows:

.

.

.

.

.

.


Step 3: Next we need to adjust the width, alignment, and color of the Table Cells. The properties of each Cell can be set individually, but we can also change the properties of several Cells at once by first highlighting the Cells we want to change.

  • Highlight the first two Cells on the leftmost side of the Table by placing the mouse pointer in upper-left hand Cell, holding down the left mouse button, and dragging the mouse down to the Cell at lower left. With these Cells highlighted your Table should look like the image at right:

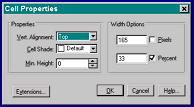
  • Cells still hightlighted, select 'Table' then 'Cell Properties' from the WebExpress Menu. The Cell Properties Window will appear as shown to the left.

  • Change the 'Vertical Alignment' list box to read "Center".

  • Change the 'Cell Shade' list box to "Dark Red".

  • In the 'Width Options' section, enter the number 30 opposite the 'Percent' check box.

  • Click 'OK' and you'll see the changes take effect immediately.

  • Now follow the above steps to highlight and change the properties of the two rightmost Cells.

Phew! Did it go okay? Good! Now highlight the two Cells in the center of your Table. We're first going to Span the center Cells across the two Rows and change them to a single Cell.

  • Select 'Table' then 'Span Cells' from the WebExpress Menu. The two Cells are now one.

While the new single Cell is still highlighted, select 'Table' then 'Cell Properties' again from the Menu, and enter the following settings for it in the Cell Properties Window:

  • Change the 'Vertical Alignment' list box to read "Center".

  • Change the 'Cell Shade' list box to "Black".

  • In the 'Width Options' section, enter the number 40 opposite the 'Percent' check box.

  • Click 'OK'. You should now have a Table that strongly resembles that Table below:

.

.

.

.

.

  • Note: You'll notice that we changed the width of the Cells using the "Percent" option. Be sure when you do this that the widths you enter add up to 100(%). In this case we specified 30 + 30 + 40 = 100. The same holds true if you specify a width using the "Pixels" option: make sure the width you enter for each Cell in a Table Column adds up to the width you entered for the entire Table.


Assignment: Finish up by entering the content into the Table, as it appears in the finished example above, on your own. If you're not sure enough of yourself yet to do so, just follow the steps below:

  • Place the cursor in the Cell at upper right, change the text color to "Yellow" using the Font Color List Box from the toolbar, and type "Page Created By:".

  • Place the cursor in the Cell at upper left, change the text color to "Yellow" using the Font Color List Box from the toolbar, and type "Date Last Modified:". With the cursor still on that line, click the Right Align button on the toolbar.

  • One Cell at a time, highlight the text you typed in both upper Cells and change the Font Size to 8 Points.

  • After changing the text color to "White" in both lower Cells, type your name into the Cell at lower left, and today's date into the Cell at lower right.

  • One at a time, highlight the text you typed in both lower Cells, change the Font Size to 14 Points, and click the Center Align button on the WebExpress toolbar so that the text in those Cells appears centered.

  • Highlight the hyperlinked WebExpress Logo (image file "aimage1.gif") that you placed at the bottom of your page earlier.

  • From the WebExpress Menu, select 'Edit' then 'Cut Text'. The image will be placed in the Windows Clipboard.

  • Place cursor inside the black Cell at the center of your table, and select 'Edit' then 'Paste Text' from the Menu. The WebExpress logo will be inserted into the Cell, hyperlink and all. Use the Center Align button from the toolbar to center the logo within the black Cell.

  • Finally, and with the cursor inside of your Table, select 'Table' then 'Table Properties' from the Menu. In the Table Properties Window change the Table Border 'Thickness' to 5 pixels, and the 'Grid Thickness' to 2 pixels.

  • Click 'OK' and you're done!


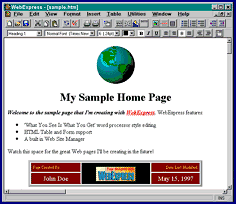
Your Web Page should now appear as shown at right:

Congratulations! You've made it through the longest part of the tutorial...

Working with HTML Tables will become easier with experience. It's well worth the effort, however, for all that Tables will add to your Web page's appearance and functionality. For example, in this tutorial all of the content for each page is written in one table consisting of three Columns of Cells.

Experiment as much as you need to.


You're now ready for the next section, 'Using Frames'.


Copyright © 1997 by MicroVision Development, Inc