Using Images: Advanced Topics | ||
You can access the Picture Dialog Window after an image is already on your page by first clicking on the image with the left mouse button to 'select' it. With the image outlined in red, select 'Edit' from the WebExpress Menu, then 'Image Properties'. There are three sections to the Picture Dialog Window. We'll explain the functions available in each: The Properties Tab
You can specify the size that an image is displayed in by adjusting it's horizontal and/or vertical dimensions. You can specify these dimensions by using proportional values or the 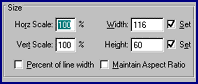 exact number of pixels you want the displayed image's dimensions to be. Proportional dimensions are calculated based the image's original size. For example, if the original image is 100 pixels high, enter a proportional height of 50% would cause the image to be displayed as 50 pixels high. exact number of pixels you want the displayed image's dimensions to be. Proportional dimensions are calculated based the image's original size. For example, if the original image is 100 pixels high, enter a proportional height of 50% would cause the image to be displayed as 50 pixels high.Enter the values for the image size in the appropriately marked text box, then click the 'Set' check box. Check the 'Maintain Aspect Ratio' box to cause WebExpress to calculate the proper dimensions that will keep the resized image proportionate to the original image. Image Margins: 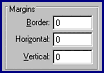 Image
Margins correspond to the HTML 'VSPACE' and 'HSPACE' modifiers, and control how much 'white space' surrounds your image both horizontally and vertically. For example, it's usually undesirable to have text butted right up against an image, so by entering a horizontal and vertical margin of, say, 10 pixels, your image will have a 10-pixel invisible border around it. Image
Margins correspond to the HTML 'VSPACE' and 'HSPACE' modifiers, and control how much 'white space' surrounds your image both horizontally and vertically. For example, it's usually undesirable to have text butted right up against an image, so by entering a horizontal and vertical margin of, say, 10 pixels, your image will have a 10-pixel invisible border around it.To display a visible border around your image, enter a value in the 'Border' text box. The color of the border will be the same color you selected for normal text on your page. Image Alignment: Selecting the proper alignment for your image is important. The nature of HTML image modifiers makes it a little confusing, however, since of the five modifiers for aligning images, three control vertical alignment and the other two control horizontal alignment. We'll describe each along with an example:
 that I've typed. that I've typed.
that I've typed.
that I've typed.
| ||
Note: When you select Left or Right alignment for an image in WebExpress, the program displays a Placeholder in the document at the point that the image was inserted. The placeholder represents the image, so when creating a hyperlink from a left or right aligned image, be sure the highlight the image placeholder rather than the image itself. That last sample sentence is displayed again below, as it appears in WebExpress with the accompanying placeholder:  | ||
As discussed within the tutorial, the High Resolution URL field is used to refer to an image from another Web site or folder. The other two fields are rarely used anymore. Alternate
Text:
The Maps Tab
| ||
|
||
That's right, the 'here' hyperlink you clicked on actually took you to the bottom of this page, where we've placed a bookmark. Click here to get back, or you can just scroll back up. | ||

 You
can control many aspects of how your your image displays from the Picture Dialog Window. By changing the image's "properties", you can adjust the image size, add a border, and more.
You
can control many aspects of how your your image displays from the Picture Dialog Window. By changing the image's "properties", you can adjust the image size, add a border, and more.